
Students will design, prototype, and print a useful object with the Robo E3 Pro or any other 3D printers that are available at all middle school sites. This object must have a purpose in life and be inspired on making the world a better place.

Main Event
Event Description
Teams of 2-4 students will design, prototype, and print a useful object with the Robo E3 Pro or any other 3D printers that are available at all middle school sites. Design Documents must be converted to a PDF file before uploading to the TOT App Submission Portal by 10:00 pm on March 15, 2024.
Designing and Creating Your Project
The process of creating your project should take the following steps:
- Brainstorm a need that could be met with a 3D-printed object.
- Use a 3D program such as SketchupMake, Tinkercad, or OnShape to create a model of your object.
- Each middle school has at least one 3D printer for you to print your car. You may use the MakerBot, Robo E3, or Robo E3 Pro 3D Printer.
- Test your object, make adjustments, and reprint if necessary.
- Bring and present your object to the judges at the Tournament.
Technical Requirements
- Objects must be completely student-created. No downloading or “remixing” someone else’s work.
- The object may be printed in pieces and then assembled with glue but NO other materials may be used.
- The object must be school-appropriate.
Design Document
Define the Problem
In this section, students will state a problem/need people have, and then ask 3-4 questions that will help them find a solution to that problem/need. Students should thoughtfully answer the 3 questions below.
- What is the problem:(Example) People want to watch Netflix on their phones, but get tired of holding their phones for an hour at a time
- Who has the problem: (Example) Any person with a cellphone who watches shows on their phone.
- How will you know your solution solved your problem: (Example) I will know my solution solved the problem when people can see their phones easily without having to hold their phones in their hands.
Prepare
- In this section, students will create a brainstorm of their initial ideas. The brainstorm may be a list, a web link, or any other representation of ideas.
- They will choose one idea and sketch it with labels. Photograph the sketch and upload it onto the document.
Include in the Document:
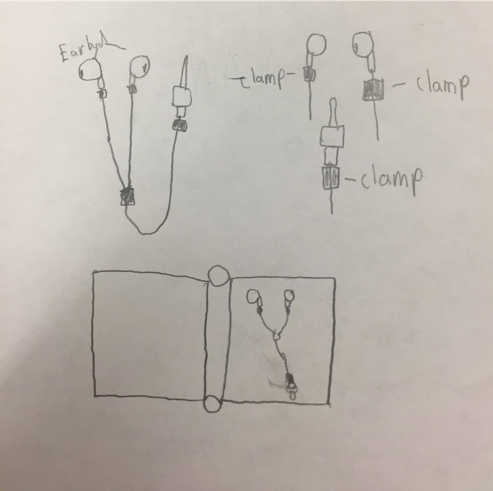
1. Explanation of sketch (sample below):
Students will write one paragraph explaining their sketch:
- The image sketch should include labels of all parts.
- What are the parts?
- How does the item work?
- How big/ small is it?
Initial Sketch of my _____________________:
Sample image sketch:
Credit: Joe Smith
2. Design Specifications (sample below):
Students will Include:
- 3D Model of item from Sketchup
- 3D model should include dimensions for all features: Width, Depth, & Height
| Front View: | Side View: | Rear View: | Picture of the actual printed item: |
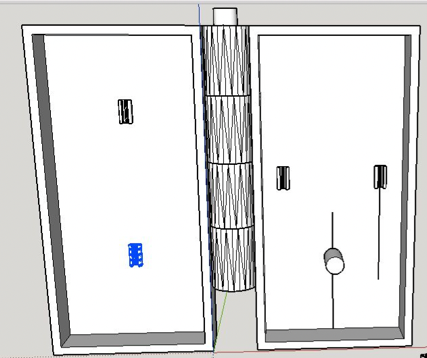 | 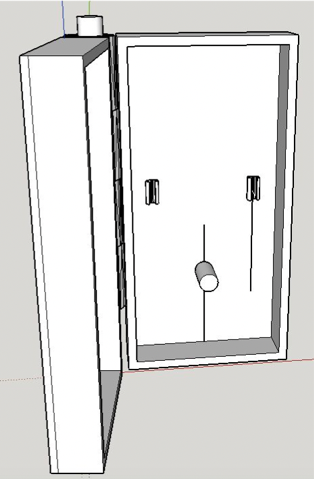 |  |  |
| Width:8cm Depth:4cm Height:14cm |
3. Testing (Sample below):
Physical Testing:
- Students will test their item to see if it works. They will take a photo of their item in use.
- Students will describe what modifications they made to the item for reprint.
Test 1:
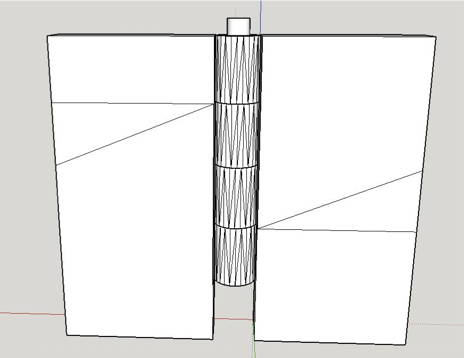
| Picture of the item in use | List Modifications Made |
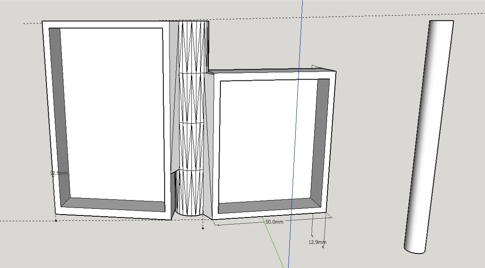 | In the first model of the design, we encountered a problem in construction. Based on the model that we had designed, the box would not close properly. As shown on the left, the sizes did not add up. The edges of the boxes did not meet, which set back the design process. We had to overcome this by adjusting the boxes so that the hinge had different positions. Instead of placing the hinge pieces every 20mm, we had to account for the fact that stacking the pieces would result in the box being taller on one side, and shorter on the other. With the new technique, the sides of the box matched and could actually close. The photo shows the newly designed box on the left that correctly fits with the previous box created. When matched, the box on the left is compatible with its partner while the right box is not. |
Test 2:
| Picture of the item in use | List Modifications Made |
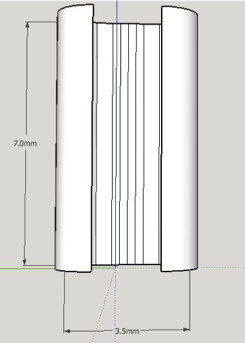 | With the second test, the goal was to have the clip hold the cord of the earbud. Unfortunately, when moved to the printer the clips were too small. The cord of the earbud that we were using, according to both Apple and our measurements, has a diameter of 2mm. Knowing that the clip would have to be small, and the printers were not able to accurately print it. Strength is a big deal for the clips, and having just a single thread of filament would not fulfill the job required. This was an issue because if the clip was scaled up then the cord would likely be too slim and slip through the opening, something we did not want to happen. We had to adjust for this by increasing the size of the clips so that the printer could print them. The result was that the clip could complete the task of locking down the cord while still being printable, a balance that took a lot of thought and multiple different versions of clips. |
Test 3:
| Picture of the item in use | List Modifications Made |
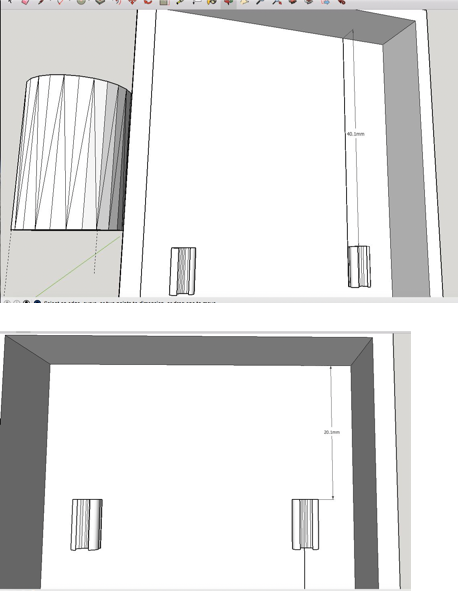 | With the next version of the design, an issue encountered was the height which the clips should be mounted. The issue was that the earbud pieces are solid and cannot be manipulated, so the clips have to be low enough for the pieces to rest. After making this adjustment, the heads of the earbuds could fit into the box, and the overall design worked very well. The first photo shows the newly designed box that has enough room to mount the earbuds, while the second shows the previous version which only had about 2.0cm of room, half of what was needed. |
Improvement/Conclusion
This section will be a one (1) paragraph conclusion. Students will evaluate how well their design worked, reflect on what went well, and parts that could be improved. They will also suggest ways to improve the device in the future.
The Design Document must be uploaded to the TOT App Submission Portal no later than 10:00 pm March 15, 2024.
View the 30-point rubric below for a scoring breakdown of the Live Challenge.
Live Challenge
Live Event Scoring
The live event will entail a team presentation of the product to the judges. Judges will not only judge the product but also respond with constructive criticisms. The team will have to respond to criticisms with their design and engineering expertise.
The Live event will be judged by the following four components
- Usefulness: 5 points
- Design & Complexity: 10 points
- Aesthetics: 5 points
- Team Presentation & Response: 10 points
Getting Help
Contact Bob Donat at Robert.Donat@fresnounified.org or Toni Eamigh at Yvette.Eamigh@fresnounified.org if you have any further questions or suggestions regarding this future competition event.